Strix is an open-source AI penetration testing tool that combines an LLM-driven workflow with a browser, an HTTP proxy and a containerized security toolkit. You give it a target and testing context; its agents investigate the application, attempt validation and produce findings for review.
For someone learning web application security, the useful question is practical: can you understand the requests it sends, reproduce its findings and distinguish a real vulnerability from a plausible explanation? This guide walks through installation, a first scan, authenticated and API testing, report review and basic CI integration.
Version note: Reviewed on November 4, 2026, using the official documentation and the v1.7.0 release, which GitHub listed as latest at the time of review. The examples below were checked against documented options and the tagged CLI source; they were not executed as a fresh DaySec benchmark. Run active tests only against your own lab or an explicitly authorized target.
In this guide
- What Strix does
- Requirements and installation
- Configure a model provider
- Run a first scan
- Choose targets and scan modes
- Write useful scope and authentication instructions
- Test an API using its specification
- Read the report and validate the evidence
- Use the local results viewer
- Add a basic CI check
- Troubleshooting and limitations
What is Strix, and what does it actually do?
The official project describes Strix as an autonomous, multi-agent pentesting tool. The open-source CLI is licensed under Apache 2.0. It can work with application source, a deployed application or a combination of both. Its approach includes dynamic testing and proof-of-concept generation, rather than only matching source code against predefined patterns.
Those are intended capabilities, not a guarantee of complete coverage or zero false positives. A finding still needs to be checked against the application’s actual behavior, permissions and business rules.
| Component | Role in a testing workflow |
|---|---|
| AI agents | Plan investigations, use tools and coordinate work on different parts of the target. |
| Browser | Navigate the interface and exercise JavaScript-driven or authenticated flows. |
| HTTP proxy | Capture requests and responses, inspect traffic and replay modified requests. |
| Terminal and Python tools | Run supporting tools and build small validation scripts. |
| Reporting | Record findings, reproduction steps, impact and remediation guidance. |
The agent tools documentation describes these building blocks. More specifically, the browser guide identifies Playwright-powered Chrome, while the proxy guide explains the Caido integration. The sandbox documentation lists tools such as Nmap, ffuf, Nuclei, Semgrep and secret-detection utilities. Their availability does not mean every tool runs during every assessment.
Requirements and installation
For the local workflow, start with a running Docker daemon and access to a supported LLM provider. The first scan downloads the sandbox image, so allow time for the image pull. The commands in this article use Bash syntax, suitable for a Linux lab shell. They are not PowerShell commands. Follow the official quick start for platform-specific installation choices.
docker versionCheck that this command reports a reachable Docker server, not only an installed client. Strix needs a functioning runtime, not merely a Docker executable on your PATH.
Option 1: the official installer
The project’s quick start provides an installer at strix.ai/install. You can download it first, inspect it and then run the saved script:
curl -fsSL https://strix.ai/install -o strix-install.sh
less strix-install.sh
After reviewing the script:
bash strix-install.sh
strix --version
strix --help
Option 2: install the Python package with pipx
If you already use pipx, the package name is strix-agent. To align this walkthrough with the reviewed release, install that version explicitly:
pipx install 'strix-agent==1.7.0'
strix --version
strix --help
The v1.7.0 package metadata specifies Python 3.12 or newer. Installing the CLI and starting Docker are separate steps. If you choose the installer instead, record the version it installs; a moving download may produce a newer release than this article.
Configure a model provider
Strix uses provider/model identifiers and supports multiple providers through LiteLLM. This example uses the OpenRouter configuration shown in the project documentation; it is an example configuration, not a claim that one model is best for every application.
export STRIX_LLM="openrouter/z-ai/glm-5.3"
read -rsp "Provider API key: " LLM_API_KEY
printf "\n"
export LLM_API_KEY
Use a key belonging to that provider and confirm that your account can access the selected model. A model identifier, a paid account and authorization for a particular testing workload are separate considerations. See the current provider documentation before choosing an alternative.
Strix can save configuration under ~/.strix/cli-config.json. Keep API keys and test credentials out of your repository. Local Docker execution also does not imply local model inference: when a remote provider is selected, prompts and selected testing context are processed through that provider. Review its data handling and your organization’s rules before supplying private code or sensitive evidence. The configuration reference documents provider settings, configuration storage and telemetry controls.
Run your first scan on a disposable copy
A local source directory is mounted into the sandbox with write access. That means the agent can change files in the directory you select. The behavior is stated in the CLI reference and the v1.7.0 argument definitions. Use a separate checkout rather than pointing your first experiment at unfinished work.
For an existing Git repository with a committed application, create a separate worktree from the current commit:
git worktree add --detach ../daysec-strix-lab HEAD
cd ../daysec-strix-lab
This copies the committed state into a separate working tree; it does not include uncommitted changes from your original directory. Then start a bounded first run:
strix -n --target . \
  --scan-mode quick \
  --scope-mode full \
  --max-budget 5
Here -n selects non-interactive execution, quick requests a shorter assessment and --scope-mode full avoids restricting this exercise to a detected diff. The budget is an illustrative USD 5 LLM-cost estimate, not a fixed price for a successful assessment.
Cost accounting is checked after model responses and may slightly overshoot when requests are already in flight. Estimates depend on provider usage and pricing information. In headless mode, reaching the budget stops the scan; in interactive mode, the documented behavior is to pause and allow continuation. An early budget stop is an incomplete assessment, not evidence that the application has no vulnerabilities. Consult the budget documentation.
Choose the right target and scan mode
The target determines what context the agent has. The following hostnames and organization names are placeholders: replace them only with assets included in your test scope.
# A local application copy
strix --target ./my-lab-app --scan-mode quick

# A deployed staging application
strix --target https://staging.example.com --scan-mode standard

# Source code and its deployed counterpart
strix -t ./my-lab-app -t https://staging.example.com --scan-mode standard
A repository URL is also supported, for example strix -t https://github.com/YOUR_ORG/YOUR_APP. Supplying source can improve context, but it does not prove the agent successfully installed or ran the application. Check the run record for what actually happened.
| Mode | A useful starting point |
|---|---|
quick | Initial exploration, short feedback cycles and pull-request checks. |
standard | Routine reviews when you want more investigation than a smoke test. |
deep | Broader pre-release assessments, with more time and cost available. |
The scan-mode guide lists deep as the default. Select a mode explicitly while learning. Published duration ranges are rough expectations; application size, authentication, model behavior and validation attempts can change the runtime substantially.
Write instructions that describe the actual test
A clear instruction file gives the agent the application context it cannot infer reliably: which environment is in scope, how test accounts differ and what outcome would demonstrate a broken business rule. Strix supports both --instruction and --instruction-file; see the custom instructions guide.
Create a file named strix-scope.txt with content such as:
Target: https://staging.example.com
Environment: disposable staging data only.

Focus:
- Compare access controls between the two supplied test users.
- Check cart quantity validation and server-side price calculation.
- Record the request, response and resulting application state.

Boundaries:
- Stay on staging.example.com.
- Exclude third-party identity, payment and email services.
- Do not send real messages or create real financial transactions.
- Stop after demonstrating the minimum evidence needed.
strix -n -t https://staging.example.com \
--scan-mode standard \
--instruction-file ./strix-scope.txt \
--max-budget 10Add disposable test-account details locally when authenticated testing is part of the exercise. Use separate accounts for role comparisons and keep the instruction file out of version control. Instructions steer agent behavior; they are not a network isolation mechanism or a guarantee that every boundary will be enforced. Keep the staging environment itself limited to the assets and data you intend to expose to testing.
Test an API using its specification
Strix accepts OpenAPI/Swagger documents and Postman collection exports. Pair a specification with the live staging base URL so the agent has both the contract and a reachable application:
strix -n \
  --target ./openapi.yaml \
  --target https://api.staging.example.com \
  --scan-mode standard \
  --instruction-file ./strix-scope.txt \
  --max-budget 10
Inspect the specification before running it. The CLI documentation says declared base URLs are treated as in-scope hosts, including values resolved from a Postman environment. An old production URL left inside a spec therefore matters. Adjust the scope file to match the API staging host and verify authentication requirements; the presence of an endpoint in a contract is not evidence that it was exercised successfully.
Read a report as a claim that needs evidence
The image below illustrates a business logic finding: a shopping-cart flow accepts a negative quantity and creates an order with a negative total. This is more specific than a generic input-validation warning because it connects an input to a changed business outcome.
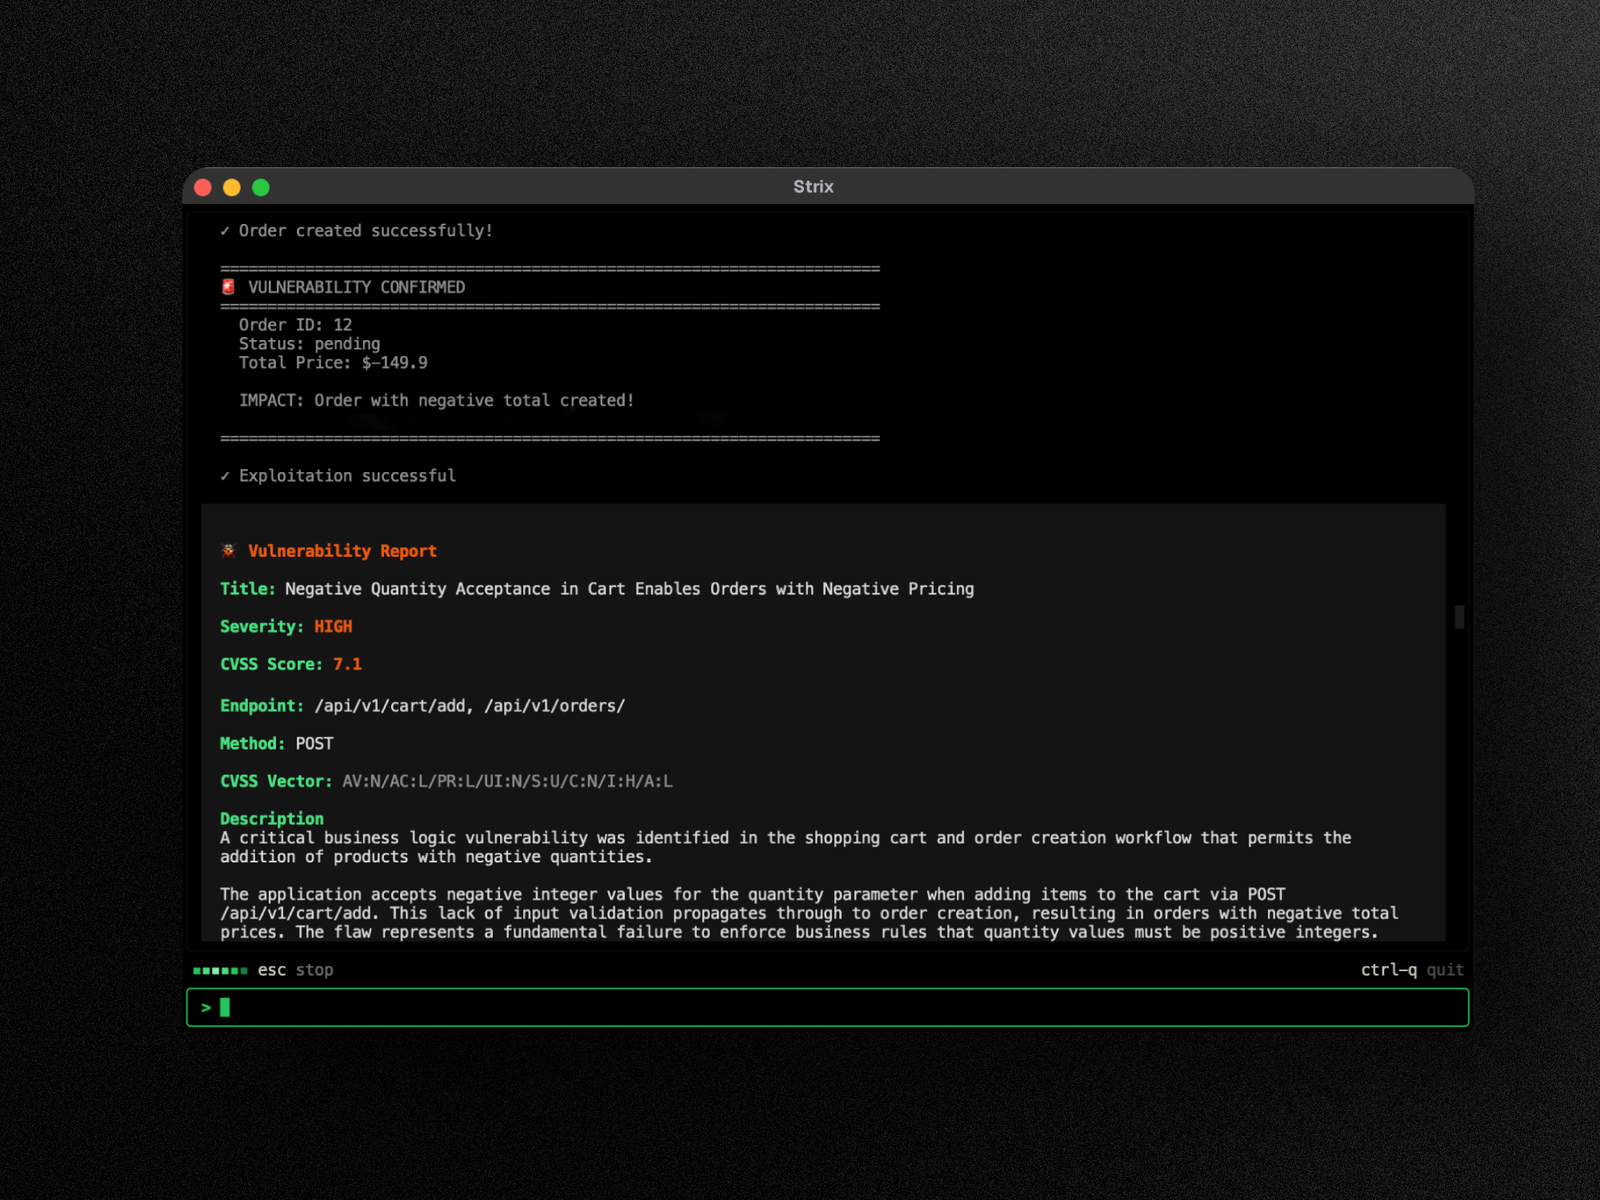
The screenshot names /api/v1/cart/add and /api/v1/orders/, shows an order total of $-149.9 and labels the finding High with a CVSS score of 7.1. Those are statements visible in the example output. They do not independently establish the behavior of any particular live application or the correctness of the score.
- Reproduce the input: inspect the exact request, account context and quantity value used.
- Check the outcome: confirm the order state on the server, rather than relying on reflected text in a response.
- Establish the boundary: determine whether the effect is limited to a draft cart or reaches an order, payment or credit workflow.
- Review the impact: assess realistic prerequisites and consequences before accepting the severity or CVSS assessment.
- Retest the fix: check that invalid quantities are rejected and the total is computed from trusted server-side values.
For this class of issue, useful regression cases include negative, zero, fractional and excessively large quantities, interpreted against the shop’s actual rules. A valid positive quantity should still work. These are review suggestions derived from the illustrated business rule, not a claim that this screenshot proves every downstream payment effect.
Strix v1.7.0 includes reporting changes that link HTTP exchange evidence, according to the release notes. Where evidence links are available, follow them. A reproducible request and a verified state change are more useful than a confident narrative alone.
Open the local results viewer
Runs are written under strix_runs/<run-name>. From the directory containing your runs, open the latest results or select a particular run:
strix view
strix view my-run-name
The viewer documentation describes a local dashboard for findings, agent activity and run history. By default it listens on 127.0.0.1 and prints a token-bearing link. Treat that link as access to potentially sensitive scan evidence. Keep the viewer on loopback for a normal local review; opening the dashboard locally does not change the model provider used during the scan.
For hands-on validation, the Caido integration guide explains how to reach the scan’s proxy from the TUI sidebar. Inspecting the underlying traffic is a useful bridge between AI-assisted testing and the manual request analysis you would perform in a proxy yourself.
Add a small CI check after the local workflow works
Start by proving the scan works on a controlled repository and that its results are useful. Then move the same workflow into a runner with Docker access. The GitHub Actions guide uses repository secrets for the model identifier and provider key, and a checkout with full history for diff resolution.
The scan step can be:
strix -n -t ./ \
  --scan-mode quick \
  --fail-on high \
  --max-budget 5
This is the scan command, not a complete workflow file: the runner still needs Strix installed, Docker available and the provider variables supplied through its secret store. Keep provider keys out of committed YAML. Begin with trusted internal branches; review the runner and secret exposure model before enabling automated testing of untrusted contributions.
| Exit code | Meaning in the documented CI workflow |
|---|---|
0 | No findings that meet the configured failure threshold. |
1 | Execution error. |
2 | Findings meet the configured failure threshold. |
With --fail-on high, lower-severity findings remain in the reports even when the job passes. Also inspect run completion: a budget-limited stop or incomplete test does not prove adequate coverage. The CI/CD reference documents exit codes and changed-file scoping. A quick diff review is not a substitute for a full application assessment.
Troubleshooting common first-run problems
| Symptom | What to check first |
|---|---|
| Docker connection error | Confirm the Docker daemon is running and docker version can reach its server. Check the active Docker context. |
| Authentication or model error | Verify the provider/model identifier, provider account access, API key and any custom base URL. |
| Target cannot be reached | Check reachability from the container environment. Container localhost refers to the container, not automatically to your host’s application. |
| Unexpected source changes | Review the selected directory and Git diff. Local code targets are writable; use an isolated worktree. |
| Unsupported option | Compare strix –version and strix –help with the version used by the guide. |
| The run stops before useful validation | Inspect budget status, provider errors and the run record. Reduce the initial scope or deliberately revise the budget. |
| The finding sounds convincing but lacks proof | Look for the actual request, response, account permissions and resulting state. Reproduce the smallest valid test. |
What Strix does not replace
AI-assisted testing can speed up exploration, but a clean report does not establish that every role, endpoint or workflow was covered. Authentication failures, missing seed data, unreachable services and incomplete setup can all narrow what was actually tested. Model output can also misinterpret intended application behavior.
Use Strix as a way to generate and investigate hypotheses, then apply the same evidence standard you would use in a manual pentest. For a learner, a productive session ends with an explanation of why a request succeeded, which trust boundary failed and how the fix changes that behavior.
The open-source local workflow and the hosted Strix platform are separate deployment choices. This article covers the local CLI. Do not assume that hosted autofix, integrations, account controls or pricing apply unchanged to a local installation; check the relevant offering before selecting it.
A practical first-session checklist
- Record the Strix version and confirm Docker connectivity.
- Use a disposable application environment and a separate source checkout.
- Choose a provider you can access, then set a small explicit scan budget.
- Start with quick mode and a narrow, understandable scope.
- Read one finding in full and reproduce its evidence manually.
- Review changes, test the remediation and retain the run record.

