Burp Suite makes the conversation between a browser and a web application visible. You can inspect a request, change one value, send it again and check whether the server still enforces the rules it should.
That workflow is useful for far more than finding injection vulnerabilities. It helps you understand APIs, compare user permissions, investigate sessions, test business logic and produce evidence that a developer can reproduce.
This guide takes you from a first installation to a structured assessment. The core exercises work with Community Edition; Professional-only features are identified separately. You need basic familiarity with browsers and HTTP, but you do not need previous Burp experience.
Scope of this guide: Burp Suite desktop editions. Documentation checked on 11 November 2026. Screenshots supplied for this article show earlier interfaces; labels and panel positions can differ in your build. Examples are instructional, not results from a new DaySec assessment.
Practice environment: Use your own lab, a disposable staging application or a Web Security Academy instance assigned to you. Agree on target hosts, accounts, request limits and excluded actions before testing an application belonging to someone else.

Contents
- 1. What Burp Suite does
- 2. Community, Professional and DAST
- 3. Install Burp and start a project
- 4. Your first capture: use Burp's browser
- 5. External browsers, proxy listeners and HTTPS
- 6. Set scope before building traffic
- 7. Learn to read an HTTP exchange
- 8. Proxy history and the Target site map
- 9. Repeater: establish a baseline, then change one thing
- 10. Lab: investigate a client-controlled price
- 11. Lab: compare access controls with two test accounts
- 12. Intruder: automate a small, defined experiment
- 13. Decoder, Comparer and Sequencer
- 14. Authentication, cookies and anti-CSRF tokens
- 15. APIs, JSON, GraphQL and WebSockets
- 16. Match and replace, Logger and Organizer
- 17. Scanner: crawl, audit and verify — Professional
- 18. Collaborator and out-of-band testing — Professional
- 19. Extensions and current AI features
- 20. A repeatable assessment workflow
- 21. Write a finding that another person can reproduce
- 22. Troubleshooting common problems
- 23. Quick reference and working habits
- 24. Frequently asked questions
- 25. Continue with deliberate practice
1. What Burp Suite does
Burp is a collection of application security tools built around an intercepting proxy. When a browser is configured to use it, browser requests pass through Burp before reaching the server, and responses return through Burp on their way back.
This position lets you observe the actual protocol exchange rather than relying on the interface. A disabled button, hidden form field or JavaScript validation rule may affect what a browser normally sends. It does not establish what the server will accept.
The most productive habit is to turn observations into testable questions. Does the server calculate this price? Does it check the owner of this object? Does this request still work after logout? Is an error caused by invalid input or an expired session?
Burp helps you investigate those questions. It does not know all the business rules of the application, and an automated result does not remove the need for verification.
2. Community, Professional and DAST
Community Edition is a useful starting point for manual testing. Professional adds automation and workflow features that matter as assessments become larger. Burp Suite DAST is a separate product for organizational scanning workflows; its capabilities and interface should not be confused with the desktop editions.
| Capability | Community Edition | Professional |
|---|---|---|
| HTTP/HTTPS and WebSocket proxy | Included | Included |
| Repeater, Decoder, Comparer and Sequencer | Included | Included |
| Intruder | Limited, slower demo version | Full version |
| Automated vulnerability Scanner | Not included | Included |
| Burp Collaborator integration | Not included | Included |
| Persistent project files | Not included | Included |
| Extensions | Compatible extensions | Compatible extensions, including Pro-only BApps |
Start with Community if you are learning request analysis and manual validation. Consider Professional when automated scanning, repeated Intruder work or reopening a complete project becomes part of your routine. Check the current official edition comparison before making a purchase; pricing is deliberately outside this guide.
3. Install Burp and start a project
Download the appropriate desktop installer from PortSwigger’s installation page. Choose the package for your operating system and architecture, run it and launch Burp. The native installer is the simplest route for most beginners; using a standalone JAR has separate Java requirements.
For a first session, choose a temporary project and start with the default configuration. Professional users can instead create a project on disk and reopen it later. Give each assessment its own project so unrelated applications, credentials and findings do not become mixed together.
Community users: a temporary project is held in memory. Closing Burp loses the project data. Export important requests and responses and maintain your notes before ending the session. Saving selected evidence or configuration is different from preserving the full project. See project files.
Record your Burp version, edition, environment and account roles at the start. Update Burp through the official distribution channel and check the release notes if a menu or workflow has changed.
4. Your first capture: use Burp’s browser
Burp’s built-in browser avoids the manual proxy and certificate setup required by an external browser. It is the best starting point when your immediate goal is to learn the tools.
- Open Proxy > Intercept.
- Click Open browser.
- Leave interception off while you browse to your assigned lab.
- Perform one recognizable action, such as opening a product or submitting a search.
- Open Proxy > HTTP history and locate the corresponding request.
- Select it and inspect both the request and response.
Next, return to Intercept, turn interception on and repeat a simple navigation. Burp should pause the request. Forward releases it; Drop prevents that request from continuing. Turn interception off again when you want normal browsing.
Intercept off does not mean capture off. Traffic passing through the proxy can still appear in HTTP history, subject to logging settings. Interception is the decision to pause messages for review. PortSwigger’s first interception tutorial demonstrates the distinction.
If a page appears to hang, check whether its request is waiting in Intercept before investigating a network failure.
5. External browsers, proxy listeners and HTTPS
Use an external browser when you need a particular profile, browser extension or environment. Keep a dedicated testing profile so unrelated personal traffic does not enter your assessment.
Configure the listener and browser
In Settings, locate the Proxy listener settings. A typical local listener is 127.0.0.1:8080. Verify that it is enabled and that the port matches your browser configuration. If another application uses that port, select a different free port in both places.
For a Firefox testing profile, open its network connection settings, select manual proxy configuration, set the HTTP proxy to 127.0.0.1 and the port to 8080, and enable the option to use that proxy for HTTPS as well. Exact wording varies by Firefox version. Check the bypass list if a local target never appears in Burp.
Chrome and Edge can use operating-system proxy settings, which may affect other applications. Follow the official external browser instructions for your platform. Retain a loopback listener for ordinary local testing; mobile-device testing requires a deliberately configured reachable listener and additional network controls.
Trust Burp’s CA in the testing browser
An intercepting HTTPS proxy creates two TLS connections: one between browser and Burp, and another between Burp and the destination. Burp generates a certificate for the destination hostname. An external browser must trust the Burp certificate authority to accept that certificate without warnings.
- With the browser proxy active, visit
http://burpsuite. - Download the CA certificate offered by the local Burp interface.
- Import it into the certificate-authority trust store used by the testing browser and allow it to identify websites.
- Restart the browser if required, then open an HTTPS lab page.
- Confirm that the page loads and its request appears in Burp.
The CA certificate documentation covers platform-specific installation. Certificate trust does not itself route traffic through Burp: the proxy must also be configured. Remove the CA from a disposable testing profile when you retire that profile, and protect the local Burp configuration and private key.
6. Set scope before building traffic
Scope describes the URLs that belong to the assessment. Begin with the exact application origin, including the scheme and relevant port. Include subdomains only when they are part of the agreed target.
For example, an assessment might include https://shop.staging.example.test and exclude payment providers, external identity services and destructive administrative workflows. A redirect to another host does not automatically make that host part of your scope.
Use Scope settings to add included URL prefixes and exclusions. You can also add a captured host or item through the Target site map context menu. Then filter the site map and HTTP history to in-scope items. If Burp offers to stop logging out-of-scope traffic, choose the behavior appropriate to your engagement.
A scope filter is not a firewall. Hiding traffic in a table does not prove that it was never sent. Check interception rules, scan tasks, extension behavior and logging settings separately. Review a task’s actual target before starting it. See setting the initial test scope.
7. Learn to read an HTTP exchange
Before automating anything, identify the fields that determine what the server will do. This is a simplified request for a fictional lab application; it is not a real endpoint or a complete message to paste unchanged:
POST /api/cart/items HTTP/1.1
Host: shop.staging.example.test
Cookie: session=REDACTED
Content-Type: application/json

{"productId":42,"quantity":1}| Part | What to investigate |
|---|---|
| Method and path | Which action or resource is being requested? |
| Query parameters | Which filters, identifiers or options are client-controlled? |
| Headers | Which authentication, content and origin details matter? |
| Cookies | Which values identify the session or application state? |
| Body | Is the content JSON, form data, XML or multipart data? |
| Response | What did the server return, and did its state change? |
HTTP/2 has a different wire format. Burp provides an editable representation; do not assume the text view is a literal recording of HTTP/2 frames. Use the protocol and Inspector controls when investigating version-specific behavior.
A 200 OK response only describes an HTTP outcome. It can contain an application-level error. A 302 may lead to a login page. A 403 may be an authorization decision or an unrelated edge-layer block. Read the body, redirects and resulting application state.
Use Inspector for structured edits
The Inspector side panel exposes request attributes, parameters, cookies and headers. It is helpful when a value is encoded or awkward to locate in the raw message. Check the final request after editing so the encoding and content type still match your intention. See getting started with Inspector.
8. Proxy history and the Target site map
Use Proxy > HTTP history as the chronological record of browser traffic that passed through Burp. Filter by host, method, content type or relevant status codes. Add comments and highlights to requests you will investigate later.
Use Target > Site map as the application-oriented view of collected URLs and content. Navigate through the application with representative accounts: public visitor, ordinary user and any privileged test role supplied for the engagement.
Create a small endpoint inventory as you browse:
| Feature | Request | Account context | Question |
|---|---|---|---|
| Account profile | GET /api/me | User A | Which fields are exposed? |
| Order details | GET /api/orders/1001 | User A | Is ownership enforced? |
| Profile update | PATCH /api/me | User A | Which fields may be changed? |
| Staff report | GET /api/staff/report | Staff | Can ordinary users reach it? |
These are fictional examples. Replace them with the actual routes in your lab. The HTTP history and site map document what each view records. A populated site map is not proof that every endpoint has been discovered or tested.
9. Repeater: establish a baseline, then change one thing
Repeater is the main tool for controlled manual testing. Right-click an interesting request and choose Send to Repeater. Open its tab and send the unmodified request first. That baseline confirms that the request still works outside the original browser action.
Now change one meaningful value, send the request again and compare the outcome. Use separate tabs for important cases and name them clearly, such as baseline-user-a, user-a-order-b and missing-session.
For a quantity field, useful cases might include a valid positive integer, zero, a negative integer and a non-numeric string. The application contract determines the expected response; some applications legitimately accept zero as a removal action.
A comparison becomes meaningful when the baseline and modified request share the same relevant conditions: account, endpoint, current state and session validity. If these change together, you cannot tell which variable caused the difference.
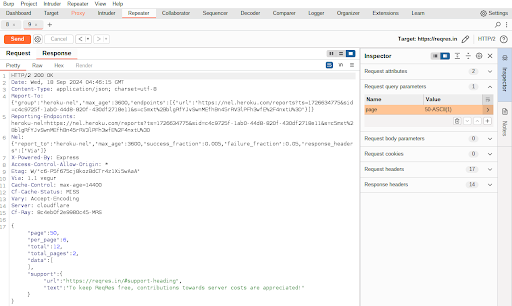
Repeater’s documentation covers message history, tab management and HTTP/WebSocket workflows. Reissuing a state-changing request can create duplicate actions: reset your lab state where necessary and verify what actually happened on the server.
10. Lab: investigate a client-controlled price
The Academy lab Excessive trust in client-side controls provides a purchasing workflow that trusts a submitted price.
- Launch your assigned lab and sign in with the credentials on its page.
- Add the named jacket to the cart and locate the corresponding
POST /cartrequest in HTTP history. - Send it to Repeater and identify the submitted
pricevalue. - Change the price to a smaller valid integer and send the request.
- Refresh the lab cart and inspect the price the server retained.
- Complete the lab’s purchase objective within that disposable instance.
The important evidence is a server-side cart or order using the submitted price. A reflected input alone is insufficient. In a real application, the relevant fix is to derive authoritative prices and entitlements on the server rather than trusting client-submitted totals.
11. Lab: compare access controls with two test accounts
This exercise requires a lab you control, two ordinary accounts and one object owned by each. The endpoint names below are hypothetical. Use disposable records and a read-only operation first.
Suppose User A owns order 1001 and User B owns order 2002. Capture a successful request from each account using a separate browser profile or session, then preserve each request in a clearly named Repeater tab.
| Test | Session | Requested object | Expected behavior |
|---|---|---|---|
| Baseline A | User A | A’s order | Allow |
| Baseline B | User B | B’s order | Allow |
| Cross-user check | User A | B’s order | Deny access to B’s private data |
| Unauthenticated check | None | A’s order | Deny access to private data |
For the cross-user check, start with A’s working request and change only the object identifier to B’s known test object. Retain A’s credentials. If you accidentally copy B’s session as well, you have tested B reading B’s own order, which demonstrates no broken boundary.
Inspect the returned fields and confirm the object owner. Identical status codes do not imply identical permissions. If an unexpected object is returned, stop after the minimum proof and preserve the redacted exchange.
For a role check, compare an ordinary test user with a supplied staff account against a staff-only action. The server must enforce both object ownership and permitted functions; hiding a staff link in the interface is insufficient.
An edited JWT claim is not automatically a valid privilege escalation. JWTs normally have integrity protection, and an unsigned modification should fail validation. Test the server’s handling of valid sessions and actual role boundaries rather than assuming that changing role in decoded JSON grants that role.
12. Intruder: automate a small, defined experiment
Intruder repeatedly sends a base request with chosen values inserted at marked positions. Use it after you understand a request and know what result you are looking for. Community includes a slower limited version; Professional provides the full tool.
For an initial exercise, use a read-only search endpoint in your own lab. Capture a working search, send it to Intruder, remove unintended payload positions and mark only the search value. Burp displays positions with § markers; these define substitutions rather than characters you normally send to the application.
Use a short list such as alpha, beta, gamma, an empty string and a punctuation character. Start with low concurrency and a delay appropriate to the lab. Review the calculated request count before launching.
| Attack type | How values are placed | Request count |
|---|---|---|
| Sniper | One payload set; each position tested individually | Positions × payloads |
| Battering ram | The same payload in every position together | Payloads |
| Pitchfork | Separate sets advanced together by index | Length of the shortest set |
| Cluster bomb | Every combination across separate sets | Product of set lengths |
With two positions and lists of three and four items, Pitchfork sends three requests and Cluster bomb sends twelve. Sniper with two positions and one three-item set sends six. These counts assume the listed positions and payloads, without extra request-producing workflow rules.
Read the attack type reference before using combinations. A small change in configuration can multiply the workload substantially.
Read anomalies as leads
Sort results by status, length or timing, and use match/extract rules to surface relevant response text. Inspect an unusual result and reproduce it in Repeater. Changes may come from timestamps, cache state, expired sessions, rate limiting or transient errors.
Stop and investigate 429 responses rather than increasing throughput. A difference in response length is a reason to look closer, not a vulnerability finding. See configuring Intruder attacks for payload processing and resource pools.
13. Decoder, Comparer and Sequencer
Decoder: identify representation before interpretation
Decoder helps transform encoded data into a form you can inspect, or encode a test value for the context in which it will be sent. Send a selected value from a message editor or paste a lab string into Decoder.
For a simple exercise, decode SGVsbG8= from Base64 and confirm it becomes Hello. URL-encoding hello world gives hello%20world; form encoding may represent spaces with +. Apply the encoding required by the actual parameter rather than repeatedly encoding an entire request.
Encoding is not encryption. Base64 decoding does not reveal a cryptographic secret merely because the result is readable. A hash is not generally reversible, and decoding the payload of a JWT does not validate its signature. See Decoder.
Comparer: examine meaningful differences
Send two responses to Comparer and inspect a word-level or byte-level comparison. This is useful for contrasting account views, baseline and modified requests, or pre-fix and post-fix behavior.
Recognize volatile fields such as dates, request IDs and anti-CSRF tokens. A visually large diff can be irrelevant; a single changed permission field can matter. Keep the original messages as evidence even if you use a normalized copy for analysis. See Comparer.
Sequencer: investigate token randomness
Sequencer statistically analyzes samples of values intended to be unpredictable. Identify the token location, collect appropriate samples and review the analysis in the context of how the application generates and uses the value.
Live collection sends requests, so choose an endpoint and volume suitable for the lab. A statistical warning does not by itself establish a practical prediction attack. A token can also fail because of leakage, reuse, weak binding or excessive lifetime even if its sampled values look random. See Sequencer.
14. Authentication, cookies and anti-CSRF tokens
A request that worked a moment ago may fail because its session expired, its token was used once, or its required preceding step was not repeated. Diagnose state problems before interpreting them as security controls.
First, repeat the action in the browser. Compare the fresh request with the failing Repeater request. Check cookies, bearer tokens, CSRF fields, redirect targets and required workflow state. Copy a current test credential only into the appropriate account’s request.
Changing browser accounts does not guarantee that every Repeater tab now uses the new account. Each request may retain old authentication data, and configured session rules can modify values before transmission. Confirm the effective account for each case.
When repeated tests require fresh state, Burp’s session handling rules can update credentials or run a macro. A macro is a recorded sequence of requests, such as fetching a form and extracting a fresh token. Restrict a rule to the intended URLs, tools and parameters, then verify its behavior on a small run.
Consult Sessions settings and the session handling rule editor. Do not assume these rules are interchangeable with Scanner’s authentication configuration; validate the authenticated state within the workflow you actually run.
For API bearer tokens, check expiration, intended audience and permissions using the test accounts provided. Successful login does not establish that logout, account switching or access control behaves correctly.
15. APIs, JSON, GraphQL and WebSockets
The same workflow applies when a web interface is a client for an API: capture the request, identify its authentication and parameters, establish a baseline and test the server’s decision.
For JSON, preserve valid syntax and the correct content type. Distinguish an absent field from null, and strings from numbers. If changing a value causes the request to fail parsing, you have not yet tested the business rule governing that value.
For GraphQL, inspect the operation, variables and authorization of returned objects and fields. A single HTTP endpoint can represent many different application actions. A successful HTTP status may contain a GraphQL errors array, partial data or both.
For WebSockets, locate the initial handshake in HTTP history and inspect application messages in Proxy > WebSockets history. Where supported, send a message to Repeater and test a controlled variation. Establish which session authenticated the connection and whether a reconnect changes that context.
Messages on an already open connection may depend on prior messages or subscriptions. Replaying an isolated message without that context can produce a misleading failure. See WebSockets history and manipulating WebSocket messages.
16. Match and replace, Logger and Organizer
Match and replace
Proxy match-and-replace rules automatically modify matching traffic. A practical lab use is adding an agreed testing identifier header to browser requests so a defender can distinguish assessment traffic.
Keep rules narrowly scoped and verify a captured request before proceeding. A broad replacement can change authentication data, break unrelated traffic or erase the baseline you intended to measure. Disable temporary rules when the experiment ends. See match and replace.
Logger
Logger helps inspect HTTP traffic generated by Burp tools, including requests that did not originate in the browser proxy history. Use the tool-origin information and filters to investigate what Repeater, Scanner or an extension actually sent. Capture settings still determine what is available. See Logger.
Organizer
Organizer keeps selected HTTP messages with annotations for later investigation. Use it for candidate findings, useful baselines and cases that require a second account. A short note such as A's session retrieves B's test invoice is more useful than interesting response.
Neither a populated Organizer nor an on-disk project replaces a clear finding record. Community users must also account for temporary-project data loss when closing Burp. See Organizer.
17. Scanner: crawl, audit and verify — Professional
Burp Scanner automates parts of dynamic application testing. Crawling explores the application; auditing looks for security issues. JavaScript-driven interfaces and authenticated content require suitable navigation and session configuration. See the Scanner overview.
Passive analysis examines existing exchanges without injecting its own attack requests. Active auditing sends additional test traffic. Starting a broader crawl-and-audit task can still navigate and submit application workflows, so decide what is appropriate before running it.
For a first scan, choose a disposable application or narrowly selected messages. Review the target, exclusions, account, scan configuration and resource limits. Watch the task and verify that it reaches the intended pages rather than spending the scan on a login screen.
Use scanning specific HTTP messages to connect automation to a request you already understand. Begin with a small area, inspect the generated traffic, then expand deliberately.
Authenticated coverage needs evidence
Configure simple login credentials or a recorded login sequence as supported by the application. A login that requires several steps may need the latter. Confirm that protected content is discovered and that the session remains valid during the scan. See configuring application logins.
Treat a reported issue as a claim. Examine its request, response, confidence and affected location, then reproduce the behavior manually when practical. An empty issue list means the configured scan did not report issues in the area it actually reached; it does not establish that the application is secure.
18. Collaborator and out-of-band testing — Professional
Some application behavior is invisible in the immediate response. An input may cause a later DNS lookup or outbound HTTP request, for example. Collaborator provides unique interaction identifiers so you can correlate such behavior with a test.
Generate a payload in Collaborator, place it in the intended input of an authorized lab request and send that request. Poll for interactions and correlate each event with its payload, timestamp and protocol. Keep different hypotheses separate so their evidence does not become mixed.
An interaction establishes that a lookup or connection occurred. It does not automatically prove a particular vulnerability or its impact: mail processors, link scanners and security products can also generate callbacks. Establish which component initiated the interaction and what boundary was crossed.
Use the Collaborator documentation for payload generation and result handling. Decide whether a public interaction service is permitted for the engagement; some environments require a private deployment. Do not send real customer data in a test payload.
19. Extensions and current AI features
Extensions can add specialized views, checks and automation. In Extensions > BApp Store, inspect an extension’s purpose, edition compatibility, maintenance status and expected resource use before installing it. Add one at a time and check its output and traffic.
A store listing does not make an extension appropriate for every project. Extensions can access sensitive requests or send additional traffic; review their code and external dependencies where that matters. The BApp installation guide explains the installation route.
For custom development, PortSwigger’s current Java examples use the Montoya API. Older material may refer to Extender or require legacy runtimes; follow the requirements of the actual extension and Burp build. See creating extensions.
Burp AI and Burp AT
Current documentation distinguishes AI features in Professional, such as assistance within Repeater, from Burp AT’s agentic testing workflows. These are optional additions to the manual workflow described here, and AI usage consumes credits. Availability and prerequisites depend on the feature and your account.
Before supplying private traffic, review what data is sent and where it is processed. Configure tool autonomy deliberately and check the actual requests and resulting evidence. An AI explanation remains a hypothesis until supported by application behavior. See Burp AI, Burp AT setup and AI settings.
20. A repeatable assessment workflow
Use the following sequence to turn individual tool actions into a coherent investigation. Its purpose is to preserve context: which account made the request, what changed, and what the server did.
- Define the assessment. Record included hosts, excluded actions, accounts, permitted automation and the environment owner.
- Prepare the project. Check the proxy, browser, scope, edition and evidence location.
- Map normal behavior. Browse representative workflows and build a route and role inventory.
- Select a question. Identify a specific boundary, such as object ownership or server-side price calculation.
- Capture a valid baseline. Confirm the account and current state in Repeater.
- Change one variable. Keep other relevant conditions stable.
- Inspect the outcome. Compare the full response and any resulting application state.
- Automate selectively. Use Intruder or Scanner only where a defined experiment benefits from repetition.
- Validate the finding. Repeat the minimum proof and rule out session, caching and test-setup mistakes.
- Document and retest. Preserve redacted evidence, explain the broken rule and verify the fix with a valid control case.
For collaboration, agree on a naming scheme for tabs and findings. Include the account role and test condition in names. This reduces the chance of mixing an administrative response with an ordinary user’s request.
21. Write a finding that another person can reproduce
A useful report connects input, account context and observable impact. It should let a developer reproduce the issue without reconstructing your entire Burp project.
| Field | What to record |
|---|---|
| Title | The affected boundary and observed behavior |
| Environment | Host, application version if known, date and test conditions |
| Preconditions | Required role, account state and disposable data |
| Reproduction | Minimal numbered steps and relevant request fields |
| Expected result | The rule the server should enforce |
| Actual result | The behavior observed and supporting response/state |
| Impact | What an attacker with those prerequisites could achieve |
| Remediation | The server-side control that should change |
| Retest | Whether the invalid case is blocked and valid behavior still works |
For the two-account example, a precise title would be Authenticated user can read another test user's private order through the order-detail endpoint. The evidence should retain A’s account context and show that the returned object belongs to B. Avoid claiming exposure of every customer’s records when you tested two known lab objects.
Redact session cookies, bearer tokens, passwords and unnecessary personal data. Mark redactions explicitly so a reviewer understands why a copied request requires fresh test credentials. Keep the original evidence in an appropriately restricted location.
Professional can generate issue reports, including HTML and XML formats documented in report settings. Review generated content and remove irrelevant or sensitive material before sharing. A project file is working evidence, not a substitute for a finished report.
22. Troubleshooting common problems
| Symptom | Check first | Next action |
|---|---|---|
| Browser waits indefinitely | A request paused in Intercept | Forward or drop it, then turn interception off for normal browsing |
| HTTP history stays empty | Browser route, active listener and matching port | Try Burp’s browser to isolate external-browser setup |
| HTTPS shows certificate errors | CA trust in the browser/profile actually in use | Install the local Burp CA following the platform instructions |
| Local app bypasses Burp | Browser/system proxy bypass rules | Review localhost and loopback exclusions |
| Listener will not start | Another process using the port | Choose a free port and update both Burp and browser |
| Repeater returns a login page | Current session and redirect chain | Capture a fresh baseline and verify the effective account |
| A valid action returns a token error | CSRF freshness and required prior steps | Repeat the browser workflow, then configure state handling if needed |
| Intruder produces only repeated errors | Payload positions, encoding and authentication | Reproduce one request manually before continuing |
429 responses appear | Rate limit or workload | Stop or reduce the workload and follow the agreed limits |
| Scanner sees public pages only | Authentication and scan coverage | Verify protected-page access within the scan |
| Mobile HTTPS still fails | Application trust policy or certificate pinning | Use an authorized debug build or documented test configuration |
| Captured content seems missing | Display filters versus logging settings | Clear filters and check what was actually recorded |
Burp’s browser is a useful diagnostic control: if it works and your external browser does not, focus on the external browser’s proxy, bypass and certificate settings. If both fail, investigate the listener, network path and target availability. See common errors.
23. Quick reference and working habits
| Task | Start here |
|---|---|
| Pause a browser request | Proxy > Intercept |
| Review browser traffic | Proxy > HTTP history |
| Review observed application structure | Target > Site map |
| Edit and resend a request | Send to Repeater |
| Substitute a controlled set of values | Send to Intruder |
| Decode a selected value | Send to Decoder |
| Compare two messages | Send each to Comparer |
| Inspect traffic generated by Burp tools | Logger |
| Preserve a candidate with notes | Organizer |
| Review a WebSocket conversation | Proxy > WebSockets history |
Common Windows/Linux defaults include Ctrl+R for Send to Repeater and Ctrl+I for Send to Intruder. Check your configured hotkeys and the context menu rather than assuming every platform or installation uses the same mapping.
Keep three habits throughout the assessment: preserve a working baseline, verify the effective account, and confirm the server-side outcome. These make the difference between an interesting response and a defensible finding.
24. Frequently asked questions
Is Community Edition enough to learn Burp?
Yes. You can learn interception, request analysis, manual replay, decoding, comparisons and controlled Intruder experiments. The main exercises in this guide do not require Scanner or Collaborator. Plan for temporary-project data loss before closing Community.
Do I need to install the CA certificate with Burp’s browser?
The built-in browser is already configured for Burp. Manual proxy and CA setup is primarily relevant when using an external browser or another client.
Does Burp find every vulnerability automatically?
No. Automated coverage depends on discovered functionality, authentication and configuration. Business rules and permission boundaries often need account-aware manual investigation. Scanner findings also require validation.
Is an unusual response length proof of a bug?
No. It identifies a difference. Inspect the content, establish a stable baseline and reproduce the security-relevant behavior before reporting it.
Can I use Burp with mobile applications?
Yes, when the application and device can route traffic through the proxy and accept the testing certificate configuration. Listener reachability, device trust and certificate pinning require separate setup. Treat mobile interception as a distinct workflow rather than assuming the desktop browser instructions are sufficient.
Why does an edited JWT stop working?
Because changing protected content normally invalidates its signature. Reading claims is useful for understanding a session, but modifying decoded JSON does not demonstrate that a server accepts the altered token.
25. Continue with deliberate practice
Start with a small sequence: capture one request, replay its unchanged baseline, change one field, compare the result and write a short finding or a clear explanation of why no issue was demonstrated. Then repeat with two account roles and a multi-step workflow.
Use PortSwigger’s interactive getting-started tutorial and the Web Security Academy for assigned vulnerable labs. Keep the desktop documentation open when a tool’s behavior or edition availability is unclear.
For related DaySec reading, Hacking Cheatsheets provides a broader reference approach, while the Strix practical guide discusses reviewing evidence from AI-assisted testing. The underlying discipline remains the same: identify the boundary, observe what crossed it, and preserve enough evidence for someone else to check your conclusion.

