Nmap helps answer a basic security question: what can another machine reach on this network? It can discover responsive hosts, test TCP and UDP ports, investigate the services behind them and collect details that support an inventory or a security assessment.
Its value comes from connecting those observations to a purpose. A newly reachable database port may indicate an unintended exposure. An expected web service that disappears after a firewall change may explain an outage. A version string can guide a patch review, provided it is verified against the system that is actually installed.
This guide explains Nmap from first principles, then builds a practical workflow around discovery, scanning, interpretation, scripting and reporting. It includes commands for controlled labs, a repeatable assessment process and the supplied reference images alongside explanations of their limitations.
Guide scope: Nmap command-line workflows, with an introduction to Zenmap and companion tools. Documentation checked on 11 November 2026. The screenshots are supplied historical examples; their versions, addresses and service details are not current DaySec scan results. The commands and illustrative output below were not executed for this article.
Practice targets: Run the exercises on your own computer or an explicitly authorized lab. The private addresses in this guide are examples, not a statement that every device using those addresses belongs to you. Define the actual hosts, protocols, exclusions and testing window before using the commands elsewhere.

Contents
- 1. What Nmap is
- 2. What Nmap is useful for
- 3. The network concepts behind a scan
- 4. Install Nmap and verify the executable
- 5. Privileges and the scanning environment
- 6. First lab: scan a service on your own computer
- 7. Read the output as evidence
- 8. Understand all six port states
- 9. Specify targets carefully
- 10. Host discovery: find responsive addresses
- 11. TCP SYN and connect scans
- 12. UDP scanning and ambiguous results
- 13. Choose ports and use a two-stage scan
- 14. Service and version detection
- 15. OS detection and the meaning of
-A - 16. NSE: add specific checks deliberately
- 17. Practical scripts: HTTP, certificates and SSH
- 18. Timing, workload and scan reliability
- 19. Save results before you need them
- 20. Compare changes with Ndiff
- 21. IPv6, routes and interfaces
- 22. Firewalls, middleboxes and advanced scan types
- 23. A repeatable assessment workflow
- 24. Turn an observation into a defensible finding
- 25. Zenmap and companion tools
- 26. Troubleshooting common problems
- 27. Quick reference, with the supplied cheatsheets
- 28. Frequently asked questions
- 29. Further reading and deliberate practice
1. What Nmap is
Nmap stands for Network Mapper. It is a freely available tool for network discovery and security auditing. At its core, it sends network probes, observes responses and classifies what those responses suggest about reachability and services.
The main capabilities are host discovery, port scanning, service and version detection, remote operating-system fingerprinting and scripted checks through the Nmap Scripting Engine, or NSE. Different options enable different stages; a plain scan does not automatically perform every one of these tasks.
Nmap is useful to administrators, defenders, developers and penetration testers. Its output is an observation from a particular source, at a particular time, using particular probes. Keep those conditions attached to the result.
The official reference guide documents the command-line behavior. Use it when a tutorial or cheat sheet gives an ambiguous explanation.
2. What Nmap is useful for
| Use case | Question Nmap helps investigate | Follow-up |
|---|---|---|
| Asset discovery | Which addresses responded from this network location? | Compare with the approved inventory |
| Service inventory | Which TCP or UDP services are reachable? | Confirm the owner and intended purpose |
| Exposure review | Is a management or database service reachable from an unintended segment? | Check firewall and application policy |
| Change verification | Did a deployment or rule change alter reachability? | Compare like-for-like scan results |
| Troubleshooting | Is the endpoint reachable on the expected port? | Inspect routes, listeners and logs |
| Assessment preparation | Which services need a closer review? | Use protocol-specific tools and manual validation |
A reachable service is not automatically vulnerable. Public HTTPS is usually intentional; public database administration often deserves closer inspection. The finding depends on the intended boundary, account requirements and actual server behavior.
Nmap also does not replace a packet analyzer or an application proxy. Wireshark helps explain packets; Burp Suite helps investigate HTTP requests, sessions and application rules. A useful workflow is to identify a web service with Nmap, then use the DaySec Burp Suite guide to examine the application behind it.
3. The network concepts behind a scan
An IP address identifies a network destination. A port identifies an endpoint within a transport protocol. A process can listen on a TCP port, a UDP port or both, and those are separate observations.
For example, 53/tcp and 53/udp are different targets even though both are commonly associated with DNS. An open TCP result says nothing by itself about the UDP result for the same number.
A normal TCP connection starts with a three-way handshake: a client sends SYN, the server answers SYN/ACK and the client acknowledges with ACK. A SYN scan uses the initial response to infer state without completing the application connection in the same way as an ordinary client. A connect scan asks the operating system to establish a TCP connection.
UDP has no equivalent connection handshake. Silence may mean a service ignored an unsuitable probe, a filter dropped it, or a response was lost. This is why UDP results often need additional context.
Finally, distinguish an application from the network device answering you. A reverse proxy, load balancer, firewall or NAT gateway can influence responses. The machine you think you are testing may not be the component that produced the observed packet.
4. Install Nmap and verify the executable
Start with the official download page or your operating system’s package repository. Record the installed version rather than assuming a distribution package matches the newest upstream release.
Windows
Use the official Windows installer and follow its Npcap setup prompts. Npcap supports packet capture and the raw-packet workflows used by several scan types. After installation, open a new PowerShell or Command Prompt window and check:
nmap --version
nmap --help
If the command is not found, verify the installation and PATH, then reopen the terminal. Use an elevated terminal when the selected scan needs the relevant privileges. The Windows installation guide explains Npcap and interface limitations.
Linux
For Debian, Ubuntu and Kali, the normal package route is:
sudo apt update
sudo apt install nmap
nmap --version
For Fedora, use its package manager:
sudo dnf install nmap
nmap --version
Distribution packaging can separate Nmap, Zenmap and other utilities. Check what your package actually includes. See the Linux installation documentation.
macOS
Use the current official macOS package and its installation instructions, then verify nmap --version in Terminal. If you use a package manager instead, confirm the package’s origin and installed version. See the macOS installation guide.
Commands beginning with sudo below use Unix shell conventions. On Windows, use the corresponding Nmap options from a suitably privileged terminal without copying the word sudo.
5. Privileges and the scanning environment
Some Nmap features need direct access to raw packets. On Unix-like systems, that normally requires root or appropriately configured capabilities. On Windows, the selected interface, Npcap installation and permission configuration also matter.
When you do not explicitly select a TCP scan method, Nmap normally chooses SYN scanning if the environment supports it and connect scanning otherwise. Explicitly requesting -sS without the required privileges can fail; do not assume Nmap will silently turn every such command into -sT.
A virtual machine, container or WSL environment adds another networking layer. Its virtual adapter, NAT, routes and capture support can change what is reachable. For repeatable lab work, a scanner VM and disposable target VM on a dedicated host-only network are often easier to reason about than a mixture of bridged, VPN and container networks.
Write down the scanner’s interface and network location. A result from a VPN client may differ legitimately from one obtained on the office LAN or a public internet connection.
6. First lab: scan a service on your own computer
This exercise uses a small local HTTP service. It teaches the relationship between a listening process and an Nmap result without requiring a network-wide scan.
Create a dedicated empty directory, enter it and start Python’s HTTP server on loopback. On Linux or macOS:
mkdir nmap-local-lab
cd nmap-local-lab
python3 -m http.server 8000 --bind 127.0.0.1
On Windows, use python in place of python3 if that is how Python is installed. Keep this terminal open. Binding to 127.0.0.1 keeps this demonstration on the local machine; the server serves the directory you started it in.
In a second terminal, run:
nmap -sT -Pn -p 7999,8000 --reason 127.0.0.1The command requests a TCP connect scan, skips discovery for the known local target and tests only two ports. If the server started successfully, port 8000 should be reachable. Port 7999 provides a comparison only if no other process is using it; its result depends on the actual machine.
Now investigate the service:
nmap -sT -Pn -sV -p 8000 127.0.0.1Nmap should attempt to identify the application on the open port. The precise product text depends on Python, Nmap and the environment; do not expect a fixed banner from every installation.
Stop the Python server with Ctrl+C in its terminal. Repeat the first scan and compare port 8000. If it remains open, check for another listener, a failed shutdown or a different address family. An unexpected result is a troubleshooting question, not a reason to rewrite the expected answer.
7. Read the output as evidence
Consider this simplified illustrative output, constructed to explain the fields rather than report a real scan:
Nmap scan report for 192.168.56.10
Host is up.
PORT     STATE    SERVICE
22/tcp   open     ssh
80/tcp   open     http
443/tcp  filtered https
8000/tcp closed http-alt| Field | What it tells you | What it does not establish |
|---|---|---|
| Target address | Destination reported for this run | That every application on a hostname was tested |
| Host is up | Discovery or scan behavior produced an up classification | That every service is healthy |
| Port and protocol | Which endpoint was tested | That TCP and UDP have the same state |
| State | Nmap’s classification from this probe and viewpoint | A universal property visible from every network |
| Service | A conventional label or an identified protocol | A verified product when only the port number was used |
Without service detection, SERVICE is commonly based on the port’s registered or conventional name. A service can run on an unusual port, or an unrelated application can occupy a familiar port number.
--reason adds information about why Nmap chose a state. Keep that detail when investigating filtering or comparing two network locations. Always retain the complete command, relevant warnings and scan completion status with your result.
8. Understand all six port states
Nmap’s state names express both observations and uncertainty. The port-scanning basics document the six classifications.
| State | Interpretation |
|---|---|
open | A service is accepting the relevant traffic |
closed | The endpoint is reachable but no application appears to be listening on that port |
filtered | Filtering or missing responses prevent a reliable open/closed decision |
unfiltered | The probe reached the port, but that scan method cannot establish open or closed |
open|filtered | The response pattern cannot distinguish an open service from filtering |
closed|filtered | The response pattern cannot distinguish closed from filtered |
For a typical TCP SYN scan, SYN/ACK supports open; RST supports closed; silence after retries or certain ICMP errors can support filtered. Other scan types interpret responses differently.
For UDP, an ICMP port-unreachable response normally supports closed. Silence commonly produces open|filtered. It would be inaccurate to turn every non-responsive UDP port into a confirmed open service.
Use the classification together with the probe type, returned reason and network context. A blocked reply path can obscure a reachable service, and a middlebox can produce a response that resembles the destination’s own decision.
9. Specify targets carefully
The examples below assume a dedicated authorized lab. Replace the addresses with its actual scope.
| Target form | Example | Meaning |
|---|---|---|
| Single address | 192.168.56.10 | One IPv4 address |
| Explicit list | 192.168.56.10 192.168.56.11 | Two addresses |
| Last-octet range | 192.168.56.10-12 | Three addresses |
| CIDR block | 192.168.56.0/28 | Sixteen candidate addresses |
| Input file | -iL targets.txt | Entries read from a file |
| Exclusion | --exclude 192.168.56.1 | Omit that address |
A /24 denotes 256 IPv4 addresses, including its endpoints. Writing a host address followed by /24 selects the whole containing block; it does not mean a more detailed scan of that one host.
Before sending probes, preview an explicit target list without reverse DNS:
nmap -sL -n -iL targets.txtFor example, targets.txt could contain these two lab addresses:
192.168.56.10
192.168.56.11
Check exclusions and the expanded address count before proceeding. The target specification reference covers supported forms.
Hostnames and DNS
A hostname is resolved to an address; its spelling does not guarantee that the resulting infrastructure belongs to the application owner. A CDN or shared-hosting address can serve many unrelated customers.
If a name resolves to multiple addresses, inspect what this run selected. Nmap offers --resolve-all for scanning all resolved addresses, but using it expands the actual target set. Confirm that set first. -n disables reverse DNS; a hostname supplied as a target still needs address resolution.
10. Host discovery: find responsive addresses
Host discovery asks which candidate addresses respond. It normally precedes a port scan, so a target that does not respond to discovery can be skipped even when an application port is reachable.
nmap -sn -n 192.168.56.0/28Here, -sn disables the port-scanning stage. Discovery is broader than ordinary ICMP echo: Nmap can use different probes, and on directly connected Ethernet networks it normally uses ARP for IPv4 or Neighbor Discovery for IPv6 when the environment permits.
If you know a particular lab host exists but discovery fails, compare a narrow scan with discovery disabled:
nmap -sT -Pn -n -p 22,80,443 192.168.56.10-Pn treats the target as up for subsequent scanning. It does not prove liveness, open a firewall rule or remove filtering. Local link-layer address resolution may still be necessary. See host discovery.
Use -Pn selectively: applying it to a mostly empty address range spends scanning effort on every supplied address.
11. TCP SYN and connect scans
SYN scan: -sS
A SYN scan sends a SYN and classifies the reply. When an open port responds, the connection attempt is reset instead of proceeding through a normal application session. It requires suitable raw-packet access.
sudo nmap -sS -n -p 22,80,443 --reason 192.168.56.10The term half-open describes the handshake behavior. It does not mean invisible: a firewall, IDS or packet capture can detect and record it. See TCP SYN scanning.
Connect scan: -sT
A connect scan asks the operating system to establish connections. It is useful when raw-packet scanning is unavailable and is a straightforward choice for the local exercise.
nmap -sT -n -p 22,80,443 --reason 192.168.56.10Successful connections may appear in service logs. The connect scan documentation explains the method. Keep the selected method consistent when comparing results; different probing behavior can change how middleboxes respond.
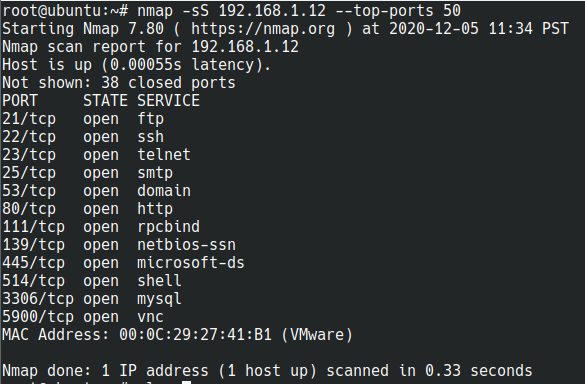
-sS and a top-ports selection against a private address. In new commands, use the documented two-hyphen spelling --top-ports 50. The listed services and timings belong to that example, not to a fresh DaySec scan.12. UDP scanning and ambiguous results
TCP coverage leaves a separate question unanswered: which UDP services are reachable? DNS, NTP and other UDP-based protocols require their own testing plan.
On a lab target intentionally configured with relevant services, begin with a short port list:
sudo nmap -sU -n -p 53,123 --reason 192.168.56.10If a result is ambiguous, follow up on that small selection with protocol-aware service detection:
sudo nmap -sU -sV -n -p 53,123 --reason 192.168.56.10An application response can resolve some open|filtered results to open. Silence can remain ambiguous even after additional probing. Record the uncertainty rather than replacing it with an assumption.
UDP scans can take substantial time because of timeouts, retransmissions and ICMP rate limiting. Reducing retries indiscriminately can remove evidence as well as shorten the run. The UDP scan chapter explains these trade-offs.
If a UDP check matters to an operational decision, confirm it with the appropriate protocol client and, where possible, server-side logs or a packet capture.
13. Choose ports and use a two-stage scan
A default TCP scan normally checks the 1,000 most common TCP ports in Nmap’s data, not every possible port. Frequency is different from numeric order: --top-ports 100 does not mean ports 1 through 100.
| Option | Selection |
|---|---|
-p 443 | One numbered port |
-p 22,80,443 | An explicit list |
-p 1-1024 | A numeric range |
--top-ports 100 | The most common 100 ports for the selected protocol |
-F | Normally the most common 100 ports using the standard data files |
-p- | Ports 1 through 65535 for the selected transport scan |
-p- does not automatically select UDP or NSE scripts. Port zero is outside that shorthand and must be explicitly requested when relevant. See port specification.
For one approved lab host, separate broad port discovery from detailed interrogation:
sudo nmap -sS -n -p- --reason -oA lab-tcp-all 192.168.56.10After reviewing the result, use the actual reachable ports you found. The following is only an example selection:
nmap -sT -sV -n -p 22,80,443,8000 -oA lab-services 192.168.56.10This keeps expensive follow-up work focused. If discovery failed for a known target, investigate that separately before deciding whether to repeat the scan with -Pn.
14. Service and version detection
-sV sends additional probes to help identify a service and, when possible, its product and version. It can identify a protocol on an unexpected port instead of relying only on the port-number label.
nmap -sT -sV -n -p 22,80,443,8000 192.168.56.10For a lighter initial investigation, Nmap provides --version-light; for a deliberately more thorough probe selection, it provides --version-all. More probing is additional application interaction, not a guarantee that every service can be identified. See service and version detection.
A product string is a lead for validation. Vendors can backport security fixes without changing the upstream-looking version, services can suppress banners, and proxies can answer on behalf of another system. Confirm package details and the relevant advisory before declaring a CVE applies.
If the output includes tcpwrapped, interpret it as a service-detection observation about an early connection close. It does not independently establish which access-control product or rule caused the close.
15. OS detection and the meaning of -A
OS detection uses network-stack behavior to compare a target against Nmap’s fingerprint database:
sudo nmap -O --osscan-limit -n -p 22,80,443,8000 192.168.56.10Choose ports appropriate to the host. OS detection works better when at least one open and one closed TCP port are available. --osscan-limit restricts attempts to promising targets; an empty result is not proof of an unknown or unusually secure operating system.
Multiple possible matches, broad kernel ranges and warnings should remain visible in the report. NAT, filtering and virtualized network paths can reduce confidence. See OS detection.
-A is a convenience bundle enabling OS detection, service/version detection, default scripts and traceroute, with the relevant privilege requirements. It does not mean all ports, all scripts or an automatic vulnerability assessment. It also does not set the timing template. See miscellaneous options.
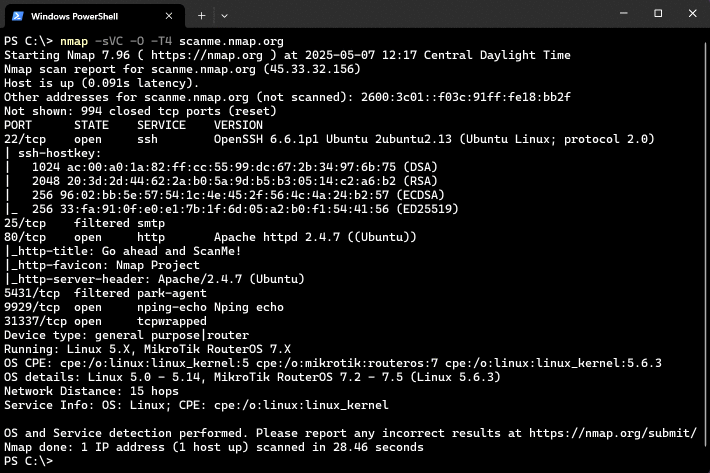
16. NSE: add specific checks deliberately
The Nmap Scripting Engine runs Lua scripts for tasks such as collecting protocol details, discovery and selected security checks. A script can do much more than identify an open port, so inspect its documented behavior before running it.
Start by reading local help without providing a scan target:
nmap --script-help "http-title,ssl-cert,ssh-hostkey"-sC selects the default script set. It is not equivalent to a guarantee that every selected script is non-intrusive. --script lets you choose explicit scripts or expressions. See the NSE command reference.
| Category | What the label describes |
|---|---|
default | Scripts selected for the default set |
safe | Scripts generally designed to avoid harmful behavior |
discovery | Information collection and enumeration |
version | Service/version detection support |
vuln | Checks related to vulnerabilities, with varying methods |
intrusive | Checks with potentially disruptive behavior |
brute, dos, exploit | Credential guessing, denial-of-service or exploitation-related functionality |
external | Checks that can interact with external services |
Scripts can belong to several categories. Selecting comma-separated categories broadens the selection; it does not automatically mean only scripts that satisfy all those labels. Read the NSE usage and expression documentation.
For reproducible assessments, prefer a reviewed list of named scripts over a broad category sweep. Record the exact selection and relevant arguments. Treat additional third-party scripts as code that requires review; NSE is not a sandbox for untrusted downloads.
17. Practical scripts: HTTP, certificates and SSH
Read a web page title
nmap -sT -sV -n -p 80,443 --script http-title 192.168.56.10The http-title script retrieves a page title and can follow redirects according to its documented rules. It is useful for identifying an unexpected default page or administration interface, but a title does not prove which application or authorization policy is behind it.
On shared hosting, use the appropriate authorized hostname and documented HTTP host arguments. A default virtual host can show a different site from the one you intended to assess. Review redirects before treating newly named hosts as additional targets.
Inspect a TLS certificate
nmap -sT -sV -n -p 443 --script ssl-cert 192.168.56.10The ssl-cert script reports certificate information such as identity fields, validity dates and subject alternative names. Those names are inventory leads; they do not expand the authorized scope. A certificate listing also does not establish that every browser trust or TLS configuration check passed.
Record an SSH host key
nmap -sT -n -p 22 --script ssh-hostkey 192.168.56.10The ssh-hostkey script collects server key information. Compare an unexpected change against your trusted inventory or server records. A key presented over the network needs an independent trust reference before you treat it as verified identity.
Cipher enumeration is a different workload
ssl-enum-ciphers repeatedly negotiates TLS connections. Its official classification includes intrusive. If that check is part of the approved lab exercise, keep it targeted:
nmap -sT -sV -n -p 443 --script ssl-enum-ciphers 192.168.56.10Read the script documentation before using the result as a TLS assessment. Its cipher grades are not a complete statement about certificate trust, application security or every supported modern TLS behavior.
18. Timing, workload and scan reliability
Timing controls trade workload, patience and completeness. Begin with the default adaptive behavior, then adjust in response to the actual lab and its agreed limits.
-T3 is the normal default template. -T2 is more conservative about workload; -T4 assumes a sufficiently responsive network. -T5 is more demanding and can sacrifice useful results when conditions do not suit it. The historical names of the slow templates do not make a scan undetectable.
For example, this limits the TCP scanning workload on one lab host:
sudo nmap -sS -n --top-ports 100 --max-rate 50 --reason 192.168.56.10--max-rate is a ceiling for the packet scanning phases it controls. It is not a universal HTTP request-rate limiter for every NSE script. Conversely, --min-rate requests a minimum sending rate and can be inappropriate on a constrained path.
Short retry limits and host timeouts can make a run finish sooner by leaving questions unanswered. Record these choices and any hosts that timed out. Scan duration also depends on the target, packet loss, rate limiting, selected ports and follow-up stages; a full scan has no reliable universal completion time.
Use the timing and performance reference for option interactions. Narrowing the question is often more useful than making a broad scan more aggressive.
19. Save results before you need them
Keep a readable report and a structured copy. Nmap’s XML is useful for downstream analysis; normal output is convenient for human review.
nmap -sT -sV -n -p 22,80,443 -oA lab-baseline 192.168.56.10-oA lab-baseline writes lab-baseline.nmap, lab-baseline.xml and lab-baseline.gnmap. The final format is grepable legacy output; XML is the better basis for new structured processing.
| Option | Purpose |
|---|---|
-oN report.nmap | Save normal text output |
-oX report.xml | Save structured XML output |
-oA report | Save the three standard file formats together |
-v | Increase verbosity |
--reason | Include state-classification reasons |
--open | Filter the display toward open or potentially open states |
--open is an output convenience, not proof that the displayed results are all confirmed open or that hidden states are irrelevant. Retain a suitable full baseline when validating a filtering change. See output options.
Use unique run names, and create any parent directory before using it in an output path. An existing filename can be overwritten; date and scope labels help prevent accidental loss of a useful baseline.
20. Compare changes with Ndiff
Ndiff compares two Nmap XML files. It can highlight hosts appearing or disappearing, state changes and differences in service details.
ndiff lab-before.xml lab-after.xmlYou need two actual XML output files and an available Ndiff executable. Check your platform’s Nmap packaging if the command is missing. The Ndiff project page explains its role and documentation.
For a meaningful comparison, keep the target set, scanner location, methods, port coverage and relevant options consistent. Compare TCP to TCP and UDP to UDP. A service newly appearing in a broader scan is a coverage difference until you establish that it was absent from the same earlier test.
Review differences with the system owner. A newly reachable port can reflect a legitimate deployment, a temporary process, a firewall error or a changed load-balancer backend. Verify the explanation before labelling the change a security issue.
21. IPv6, routes and interfaces
IPv6 is a separate part of exposure coverage. Checking a host’s IPv4 address does not establish what its IPv6 listeners or firewall policies allow.
For an authorized lab hostname with an assigned IPv6 address:
nmap -6 -sT -p 22,80,443 lab-host.example.testThe hostname is a placeholder and must resolve within your lab. Both scanner and destination need suitable IPv6 connectivity. A link-local address also needs the correct interface zone identifier. See IPv6 options and target addressing.
Use nmap --iflist when you need to review the interfaces and routes Nmap sees. A VPN, virtual adapter or container interface can explain why a probe takes a different path from the one you expected.
Avoid treating a large IPv6 prefix as a practical discovery target. Start with a known inventory, assigned lab addresses or other approved address sources. The number of possible addresses can be enormous even when the network contains few active devices.
22. Firewalls, middleboxes and advanced scan types
A filtered result describes incomplete knowledge from the selected path. To validate a firewall policy, define a small matrix: which source segment should reach which destination port, and which should be denied. Test from those authorized locations and compare with firewall logs.
An ACK scan, -sA, can help distinguish filtering behavior. Its unfiltered result does not mean an application is listening. FIN, NULL and Xmas methods use different TCP flags and depend on stack behavior; they should not be treated as universally reliable substitutes for SYN or connect scanning.
Other specialized methods include SCTP scans, IP protocol scans and legacy techniques documented in the scan techniques reference. An IP protocol scan investigates protocol numbers, not the TCP or UDP port-number space.
Nmap also has options for fragmentation, spoofing and other specialized network experiments. Their relevance depends on the controlled test question and network path. They provide no blanket guarantee of anonymity or firewall bypass. In particular, the documented --proxies option affects supported version-detection/NSE connections, not every discovery or raw port-scan packet. See firewall and IDS options.
A web application firewall is concerned with web traffic and application-layer decisions. A slower TCP scan or -Pn is not a universal way to bypass it. Separate transport reachability from the behavior of the application, proxy and security devices behind the open port.
23. A repeatable assessment workflow
Use Nmap to answer defined questions in stages. That makes both workload and conclusions easier to review.
- Define scope. Record actual hosts, protocols, excluded assets, permitted scripts and the test window.
- Record the scanner context. Save version, privileges, interface and network location.
- Preview targets. Expand lists with
-sL -nand review exclusions. - Discover where appropriate. Use host discovery to identify responsive candidates, while accounting for known hosts that may not answer it.
- Scan selected TCP ports. Begin with the ports needed for the question, then broaden coverage if required.
- Plan UDP separately. Select likely or required services rather than silently omitting the protocol.
- Identify reachable services. Use targeted
-sVand reviewed scripts. - Validate observations. Correlate with service clients, inventories and server or firewall logs.
- Preserve evidence. Keep the command, complete output, warnings and limitations.
- Retest changes. Repeat a comparable scan and verify both the corrected boundary and intended valid access.
For a small two-host lab, a staged starting point could be:
nmap -sL -n -iL targets.txt
nmap -sn -n -iL targets.txt -oA lab-discovery
nmap -sT -n --top-ports 100 --reason -iL targets.txt -oA lab-tcp
These are separate runs, not an automatic pipeline where only previously responsive hosts are passed forward. In the third command, Nmap performs its own normal discovery for the addresses in targets.txt. For a known host that was skipped, investigate the discovery issue explicitly.
24. Turn an observation into a defensible finding
Suppose a database administration service is reachable from a segment where policy says it should not be. The finding is the violated access boundary, supported by a repeatable observation from that segment.
| Report field | Useful evidence |
|---|---|
| Affected asset | Address, protocol, port and relevant hostname |
| Source context | Scanner segment, route and test date |
| Expected policy | Which source should be allowed or denied |
| Observed behavior | State, reason and verified service interaction |
| Reproduction | Exact command and necessary conditions |
| Impact | What this reachability permits, with stated prerequisites |
| Limitations | Untested ports, timeouts, fingerprint uncertainty or missing credentials |
| Remediation | The specific listener, firewall or access-control change |
| Retest | The same unauthorized path blocked and required paths still working |
Avoid escalating a banner into a confirmed exploit. For a suspected vulnerable version, identify the actual package, vendor patches and affected configuration. Record a version-based suspicion separately from a validated weakness.
A negative scan also has limits. It establishes that the selected run did not observe the specified exposure under its conditions. It does not establish that every interface, protocol, account context and network path is secure.
25. Zenmap and companion tools
Zenmap is Nmap’s official graphical interface. It can help construct commands, save reusable profiles, view results and compare runs. The command line remains useful for recording a precise invocation and integrating results into other workflows. See Zenmap.
Ndiff handles result comparisons. Ncat supports general network connection tasks, and Nping supports packet-generation and response-analysis experiments. They belong to the wider Nmap toolset but have separate command syntax and purposes. Installing one component does not prove every companion executable is available on your platform.
For application assessments, continue with tools appropriate to the protocol. Nmap can tell you that a web service is reachable and help identify it; access-control logic, browser sessions and transaction behavior require further application-level testing.
26. Troubleshooting common problems
| Symptom | Possible explanation | Next check |
|---|---|---|
| Command not found | Nmap is missing from PATH or not installed | Verify the official installation and reopen the terminal |
| SYN scan fails immediately | Raw-packet privileges or interface support missing | Check the environment or explicitly use -sT where appropriate |
| Known host appears down | Discovery probes or their replies are blocked | Verify the route and try -Pn on a small known target |
| Every TCP port is filtered | Filtering, loss or an incorrect path | Review reasons, routing and firewall logs |
| Many UDP ports are ambiguous | Non-responsive services or filtering | Use targeted protocol-aware follow-up |
| Product version missing | Unrecognized protocol, suppressed banner or wrong port | Confirm the service and try a focused -sV run |
| OS guesses are broad | Insufficient fingerprints or a middlebox | Preserve the uncertainty and confirm through inventory |
| Script does not run | Port/service rule did not match, or prerequisites missing | Read the script help and confirm the selected service |
| Web result is the wrong site | Default virtual host, SNI or shared infrastructure | Verify the hostname and documented script arguments |
| Scan takes too long | Timeouts, UDP rate limits or broad coverage | Narrow the question and inspect progress and warnings |
| Output file missing | Wrong working directory, path or permissions | Use an existing writable directory and verify the filename |
| Before/after results disagree | Real change or differing coverage and source context | Compare the exact commands and network locations |
Use a small reproducible case when diagnosing a failure. A one-host, one-port check is easier to explain than a large scan with many optional stages. Do not respond to ambiguous output by immediately adding more scripts or higher rates.
27. Quick reference, with the supplied cheatsheets
| Goal | Example for the authorized lab |
|---|---|
| Check version | nmap --version |
| Preview targets without reverse DNS | nmap -sL -n -iL targets.txt |
| Discover responsive hosts | nmap -sn -n 192.168.56.0/28 |
| Connect scan of selected ports | nmap -sT -p 22,80,443 192.168.56.10 |
| SYN scan, with suitable privileges | sudo nmap -sS -p 22,80,443 192.168.56.10 |
| Most common 50 TCP ports | nmap -sT --top-ports 50 192.168.56.10 |
| TCP ports 1 through 65535 | nmap -sT -p- 192.168.56.10 |
| Selected UDP ports | sudo nmap -sU -p 53,123 192.168.56.10 |
| Service identification | nmap -sT -sV -p 22,80,443 192.168.56.10 |
| Known host with discovery disabled | nmap -sT -Pn -p 443 192.168.56.10 |
| Save three output formats | nmap -sT -p 22,80,443 -oA lab-result 192.168.56.10 |
| Read help for a script | nmap --script-help http-title |
The supplied images below are visual memory aids. The explanations and commands in this guide take precedence where a label is abbreviated or historical.
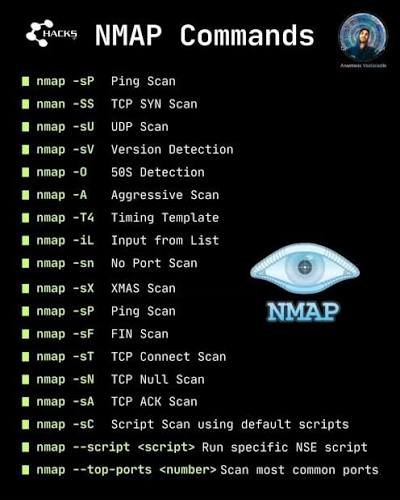
-sP is legacy discovery syntax; use -sn in new commands. The image’s shorthand descriptions of -A, -sC and advanced scan types need the qualifications explained above. A SYN scan is observable, and default scripts are not a universal non-intrusive set.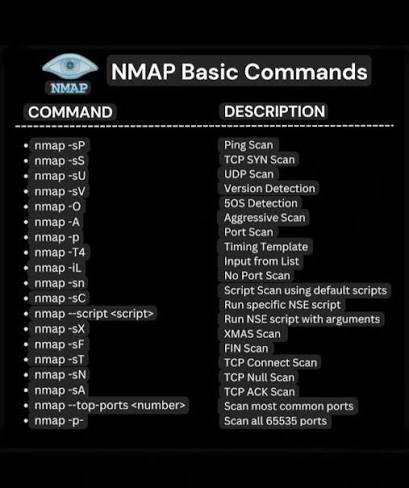
-p needs a port selection, -p- covers ports 1–65535 for the selected transport scan, and -sA reports filtering-related information rather than directly proving an open service. Use the current syntax in the table above.28. Frequently asked questions
Does a default Nmap scan check every port?
No. A normal default TCP scan generally checks the most common 1,000 TCP ports. Select explicit ports or -p- when that broader coverage is part of the assessment. Add a separate UDP plan when needed.
Does -sn send no network traffic?
No. It disables port scanning but still performs host discovery. By contrast, -sL -n lists targets without the normal discovery and port-scanning probes or reverse-DNS queries.
Is a closed port a sign of a broken firewall?
No. A policy can intentionally reject traffic rather than silently drop it. Read the response in the context of the required policy instead of treating closed and filtered as universal pass/fail grades.
Can a scan miss a service that is running?
Yes. It might be on an untested port or address family, bound to a different interface, blocked from this source, skipped by discovery, or obscured by loss and timeouts. A running process and a reachable service are different observations.
Does -A mean a vulnerability scan?
No. It enables a collection of advanced information-gathering stages. Some NSE scripts can check specific weaknesses, but there is no automatic guarantee of complete vulnerability coverage.
Should I run every NSE script to be thorough?
No. Scripts have different purposes and impact. Choose a reviewed set that answers your questions and fits the scope. A larger script selection can add risk and noise without useful coverage.
Can I repeat the public scan shown in the screenshot?
The screenshot is historical illustration. The exercises here use your computer or your authorized lab. Any public practice service has its own current usage rules; inspect those rules before sending traffic and do not assume they permit every script or workload.
29. Further reading and deliberate practice
For the first learning session, complete the loopback HTTP exercise, explain each field in the result and record what changes when the service stops. Then move to a small lab with known hosts and compare expected reachability against the observed TCP and UDP results.
The two supplied reading sources offer complementary starting points: NiaziSec’s Complete Nmap Guide provides a broad command-oriented reference, while HackerTarget’s Nmap tutorial walks through scanning concepts and output. This DaySec guide uses an original structure and explanations, with command behavior checked against the official documentation rather than reproducing those guides.
Keep the Nmap reference guide, the NSE script documentation and the relevant protocol documentation nearby. The useful skill is not memorizing the longest command: it is choosing a test that answers a specific question and reporting what the evidence supports.

